Create and Launch an Experiment
This page is a field-by-field reference for the Create Experiment form. After you complete it, the Experiments list will show a new entry with status Not Started, waiting for you to start it once all prerequisites are met.
Just want the fastest path to get started? See Quick Start. This page is the detailed field reference behind it.
Scenario example: Your casual puzzle game has a new level-completion reward popup. You want to verify whether it improves 7-day retention — without exposing all players to the risk. Create an experiment, show the new popup to only 20% of players, and let the data decide before rolling out fully.
Opening the creation form
Click Experiments in the left navigation → click Create in the top-right corner. The form has three sections; fill them in order.
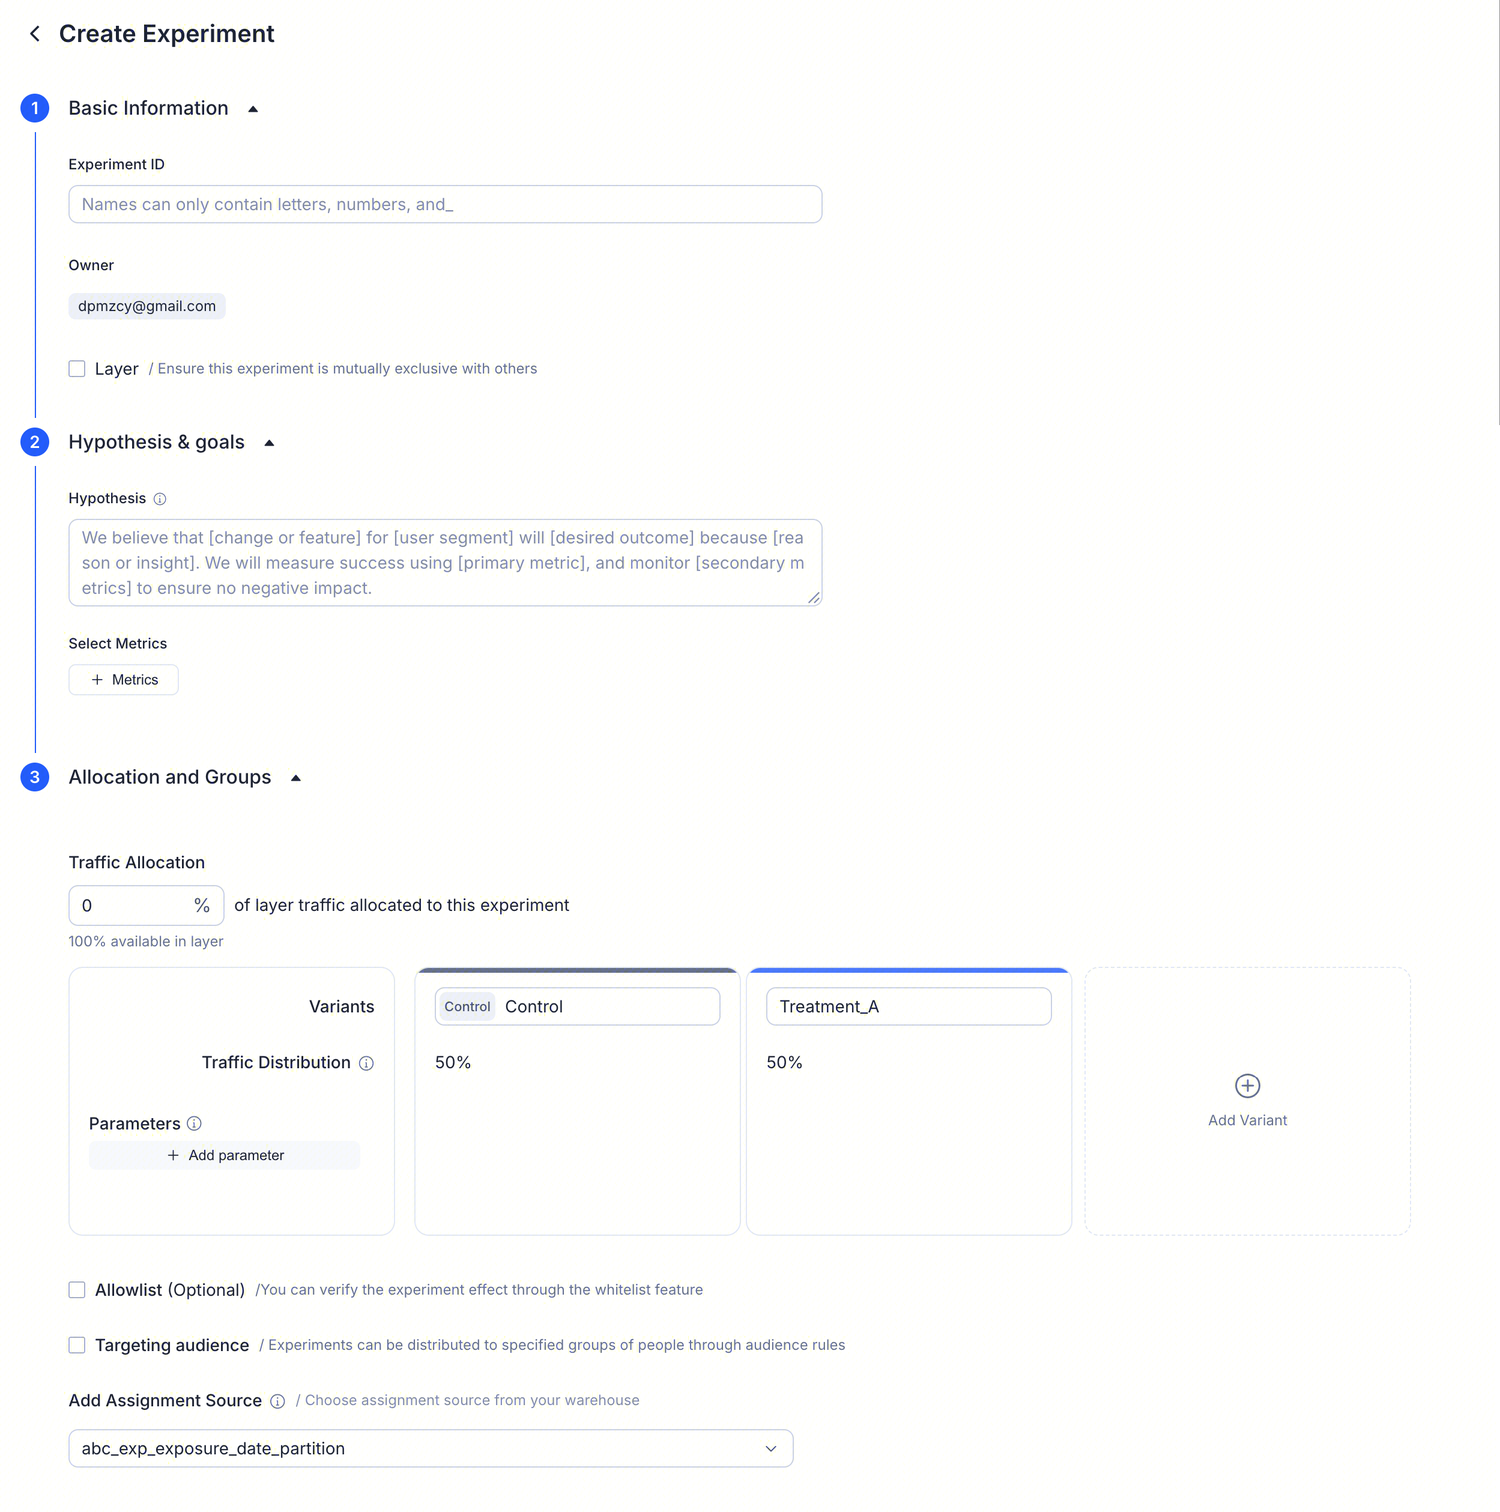
1. Basic Information
This section gives the experiment its "identity" — the SDK and analytics reports will reference these fields permanently.
| Field | Required | Description |
|---|---|---|
| Experiment ID | Yes | The stable identifier used in code. Only letters, numbers, and underscores; max 60 characters. Cannot be changed after creation — choose a name intended for long-term use, such as puzzle_reward_popup_v2 |
| Owner | Yes (default) | Defaults to the current account; collaborators can be added. Everyone listed here can edit the experiment and participate in decisions |
| Layer | No | Off by default — the experiment runs on an implicit layer with 100% of the traffic. Enabling this makes the experiment mutually exclusive with other experiments in the same layer; you can select an existing layer from the dropdown or go to Layers & Domains to create one first |
Why layers matter for games: Casual games often run multiple experiments simultaneously — a store pricing test and a daily reward retention test may run in parallel. Without layer isolation, the same player could be assigned to both experiments, making it impossible to tell which change drove the metric movement. Layers ensure each experiment gets a clean, independent slice of traffic.
2. Hypothesis & Goals
A clear hypothesis prevents the team from "fishing for significance" in the data. It forces you to define what success looks like before you see the results.
| Field | Required | Description |
|---|---|---|
| Hypothesis | No | Describe what this experiment changes and why you think it will work. Template: We believe [change] will [expected outcome] for [audience] because [reason], measured by [primary metric] |
| Select metrics | Yes | Add at least one primary metric, otherwise the Results page cannot render comparison charts; secondary metrics as guardrail metrics are optional |
Game example — how to write a hypothesis: We believe showing a spin-the-wheel animation (instead of a static chest) to players returning on day 3 will increase 7-day retention by at least 2 percentage points — because dynamic reward feedback creates a stronger dopamine loop. Primary metric: D7 retention rate. Guardrail metrics: ARPU and ad watch rate, to ensure revenue is not negatively affected.
For metric types and configuration details, see Metrics Catalog.
3. Allocation and Groups
This section determines who is exposed and what each variant delivers. In game scenarios, traffic allocation deserves extra care: too little and you'll wait weeks for significance; too much and you expose potentially harmful variants to a large number of paying players.
Traffic Allocation
A number from 0 to 100, representing the percentage of the current layer's traffic assigned to this experiment. The available traffic remaining in the current layer is shown below. The default is 0% — meaning that even after creation, the experiment will show Not Active in the list. Change this to a value greater than 0 before launching.
Casual game recommendations: Low-risk UI changes (button color, popup timing) can safely use 50–100% traffic to reach conclusions quickly with high DAU. Changes involving payment (pricing, bundle composition) should start at 10–20% to keep revenue risk within an acceptable range.
Variants
Every experiment comes with Control and Treatment_A by default, split 50/50. Click Add Variant to add more treatment variants; all percentages must sum to 100% before you can start.
Game example: Test three interstitial ad frequencies — Control (every 5 levels), Treatment_A (every 3 levels), Treatment_B (every 7 levels) — to find the optimal balance between ad revenue and session length.
Parameters
If your code needs to read configuration values from this experiment (button color, runtime flags, thresholds, etc.), click + Add parameter. Each variant provides its own value for each parameter; both the SDK and HTTP API reference parameters by name.
Game scenario — parameters in practice: A puzzle game reads
bonus_multiplierfrom the SDK. Control gets1(current behavior), Treatment_A gets2(double coins on level completion). The game code reads this parameter at runtime — no release required, no client update needed.
Allowlist (optional)
Force specified users into a particular variant. Allowlist exposures bypass traffic allocation and audience rules, and are primarily used for QA sign-off and small-scale previews.
Value for game teams: Before going live, QA and producers want to see the Treatment variant in the game themselves. Add their player IDs to the Allowlist and they will always see the new variant, regardless of random assignment.
Targeting Audience (optional)
Restrict the experiment to a specific audience. The audience's rules are displayed in read-only form below, so reviewers can see the full filter conditions without leaving the current page. Create audiences in Audiences Overview first.
Game scenario: You only want to test a harder difficulty curve on players who have reached level 50 or above, because new players do not yet have the skill level to perceive the difference. Create an audience rule
level >= 50and associate it here.
Assignment Source
The data warehouse table the platform reads to attribute exposures. The default value is usually pre-filled. For table schema details, see Data Warehouse Overview.
Submit and launch
Click Create. A new row appears in the experiments list with status Not Started. The detail page opens directly to the Setup tab — same fields as above, but editable in place.
To start the experiment:
- Complete all prerequisites listed under Experiment prerequisites (audience, parameters, optional Allowlist)
- Click Start in the header
- Status changes to In Progress and the Results tab begins accumulating data
 .
.
What happens in your game next: After the experiment starts, players entering a session are silently assigned to a variant by the SDK. Depending on your DAU, you will see cumulative exposures climbing in Results within a few hours. Most casual game experiments reach statistical significance within 7–14 days.