BigQuery Connection
This guide walks you through configuring a data connection between ABetterChoice and Google BigQuery. The whole process consists of the following 5 steps and takes about 10–15 minutes.
Overview
- Enable BigQuery as a data source on the ABetterChoice platform
- Authorize the ABetterChoice agent to impersonate your GCP service account
- Grant BigQuery permissions to the service account (for running queries and reading/writing datasets)
- Grant Dataproc permissions to the service account (optional, only required for HTE analysis)
- Fill in the connection details on the ABetterChoice platform to complete the setup
Before you start, make sure you have a GCP project where you hold admin privileges, and a GCP service account dedicated to this connection.
Step 1 · Enable BigQuery as a data source on the ABetterChoice platform
Open the ABetterChoice project settings page, navigate to the Data Sources section, select BigQuery as the data source type and enable it.
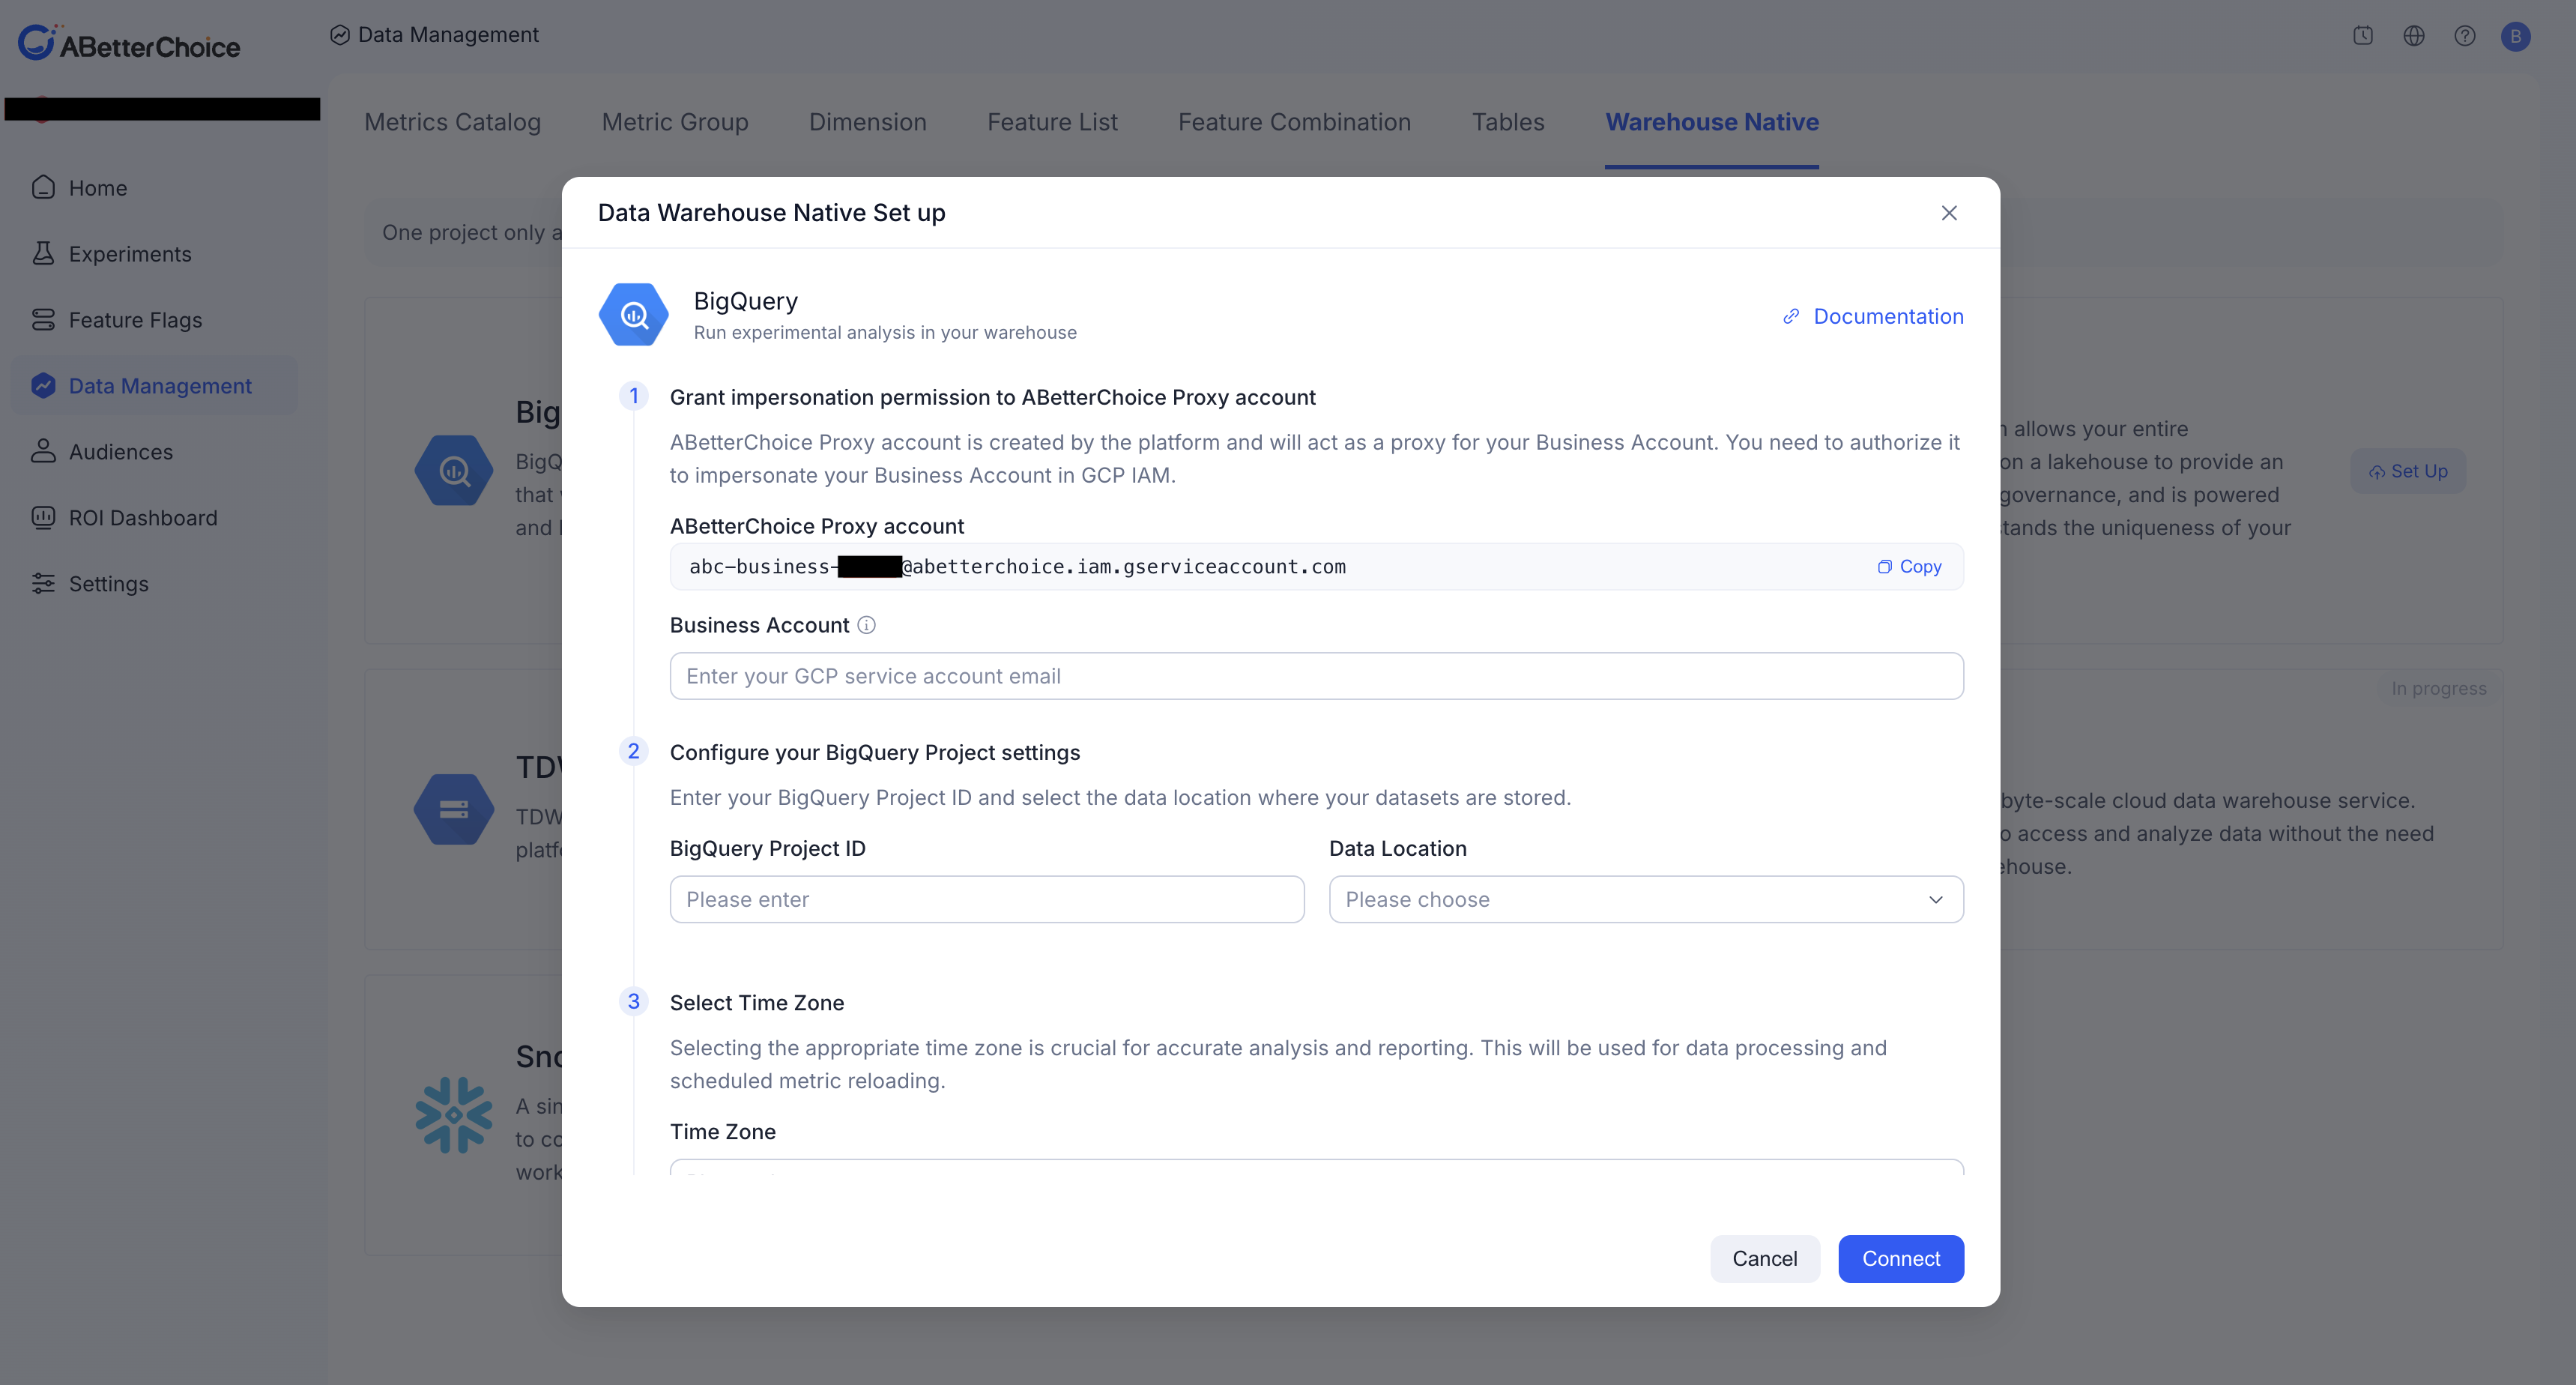
Once enabled, the platform will redirect you to the connection details page. Keep this page open so that you can come back to it in Step 5.
Step 2 · Authorize the ABetterChoice agent to impersonate your GCP service account
To allow ABetterChoice to securely access BigQuery data on your behalf, you need to complete the following authorization in the Google Cloud console.
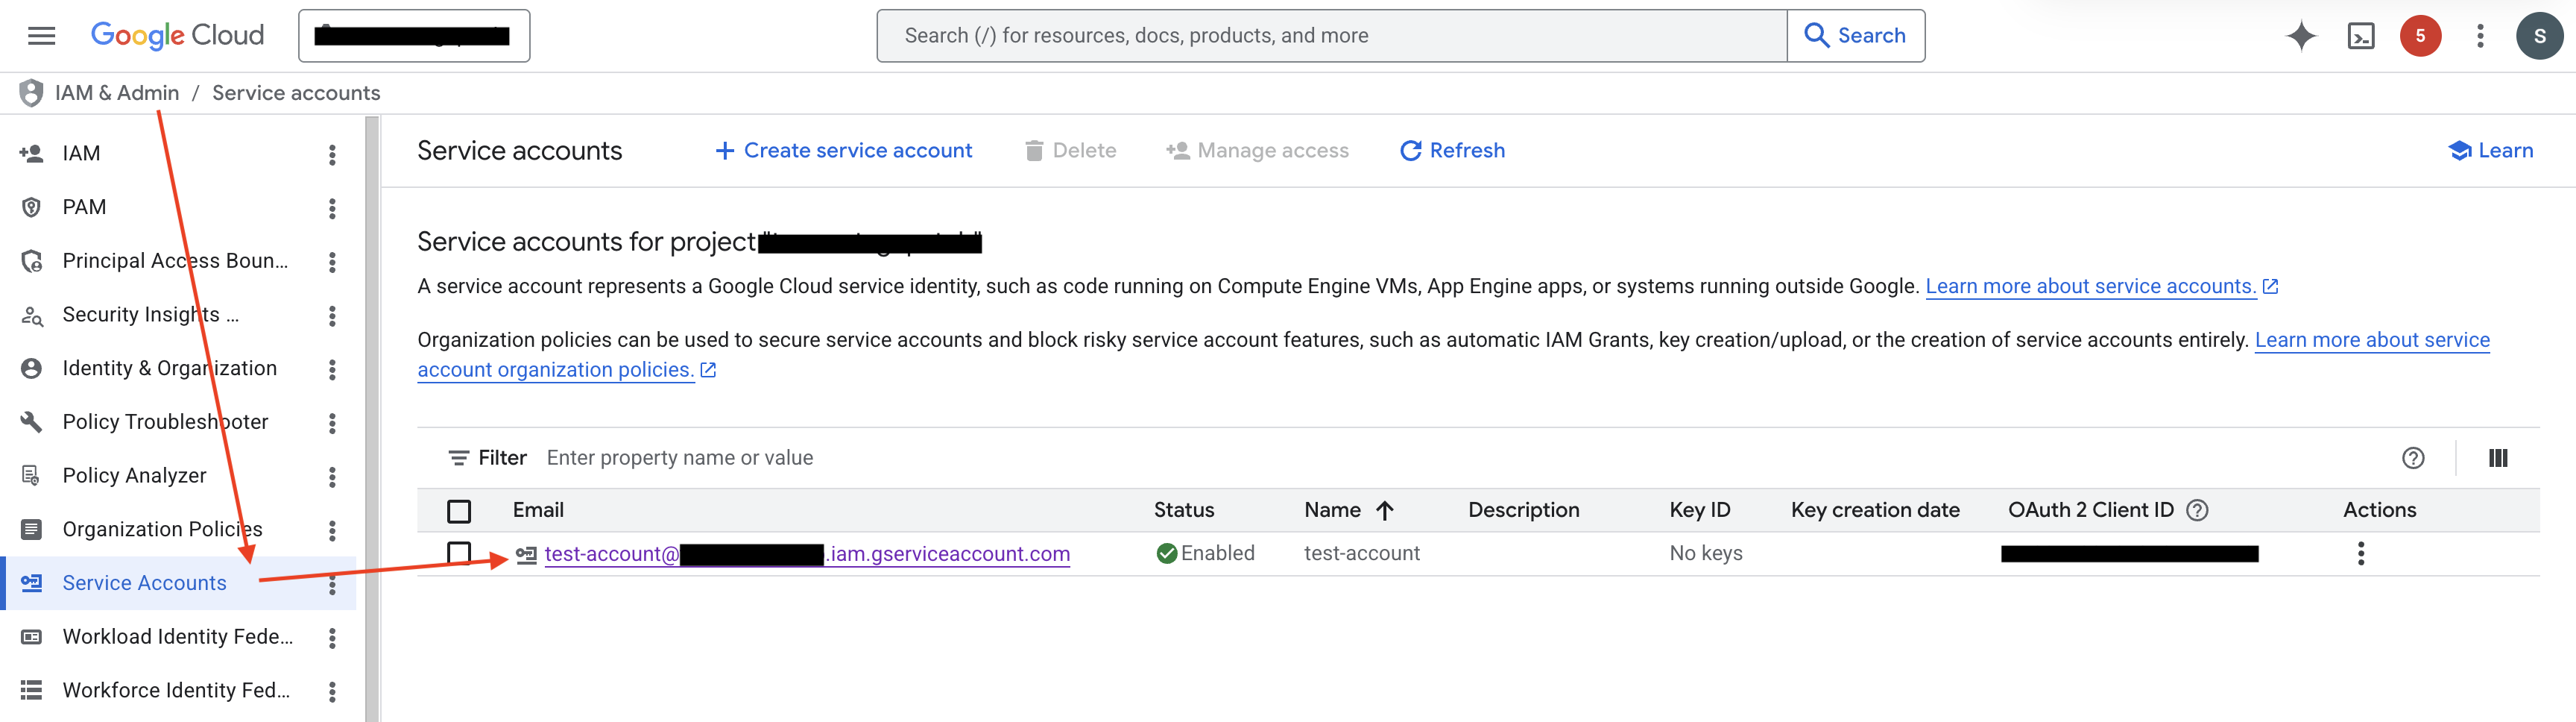
Step 2.1: Open the service account details page
Go to the IAM & Admin / Service accounts page in the GCP console, locate the service account you want to authorize, and click into its details page.
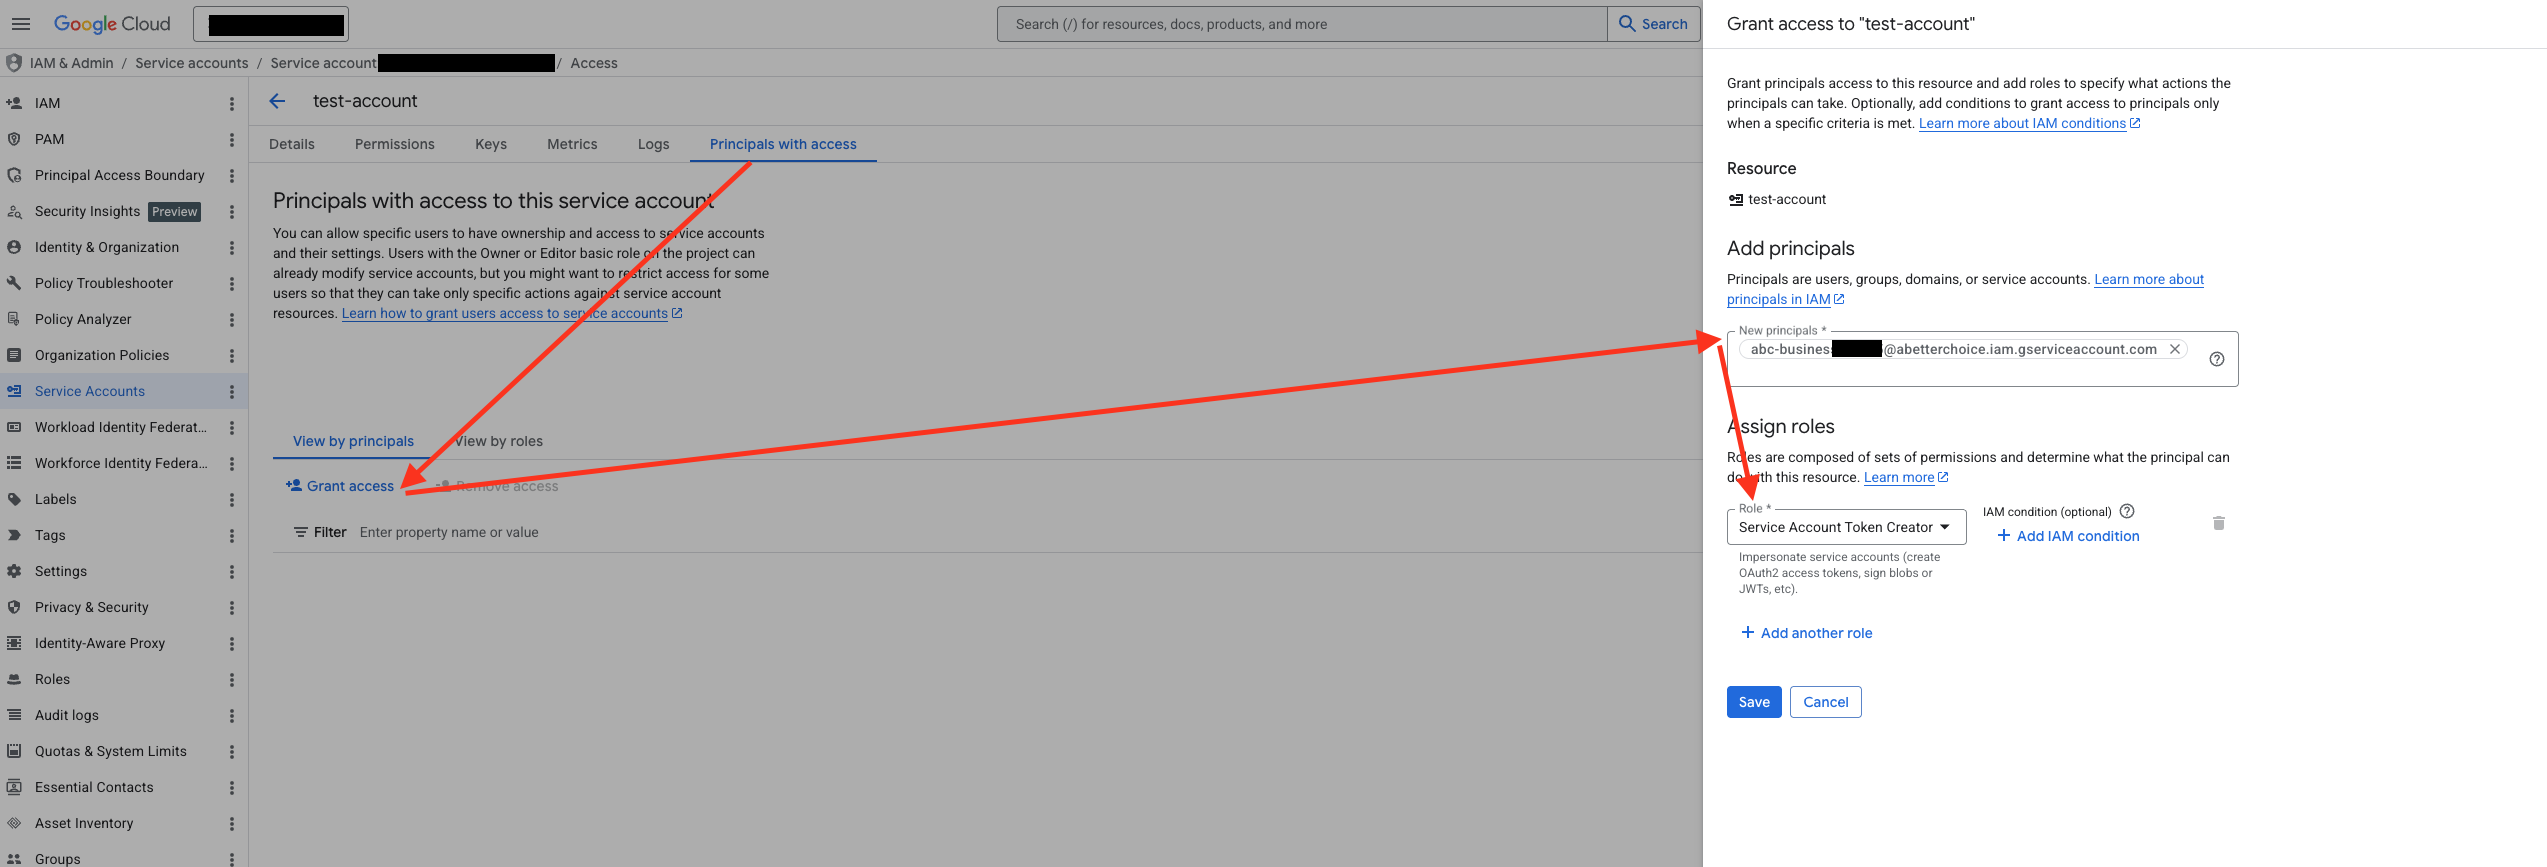
Step 2.2: Grant the Token Creator role to the ABetterChoice service account
In the details page, switch to the Principals with access tab, click Grant Access, add the ABetterChoice service account as a principal, and assign it the Service Account Token Creator role.
This role allows ABetterChoice to mint short-lived access tokens for your GCP service account when needed, so that it can access BigQuery on your behalf without ever holding a long-lived key.
Step 3 · Grant BigQuery permissions to the service account
After the agent authorization is in place, you also need to grant BigQuery permissions to your GCP service account so that ABetterChoice can run queries and read/write the required datasets. Complete the following three sub-steps in order:
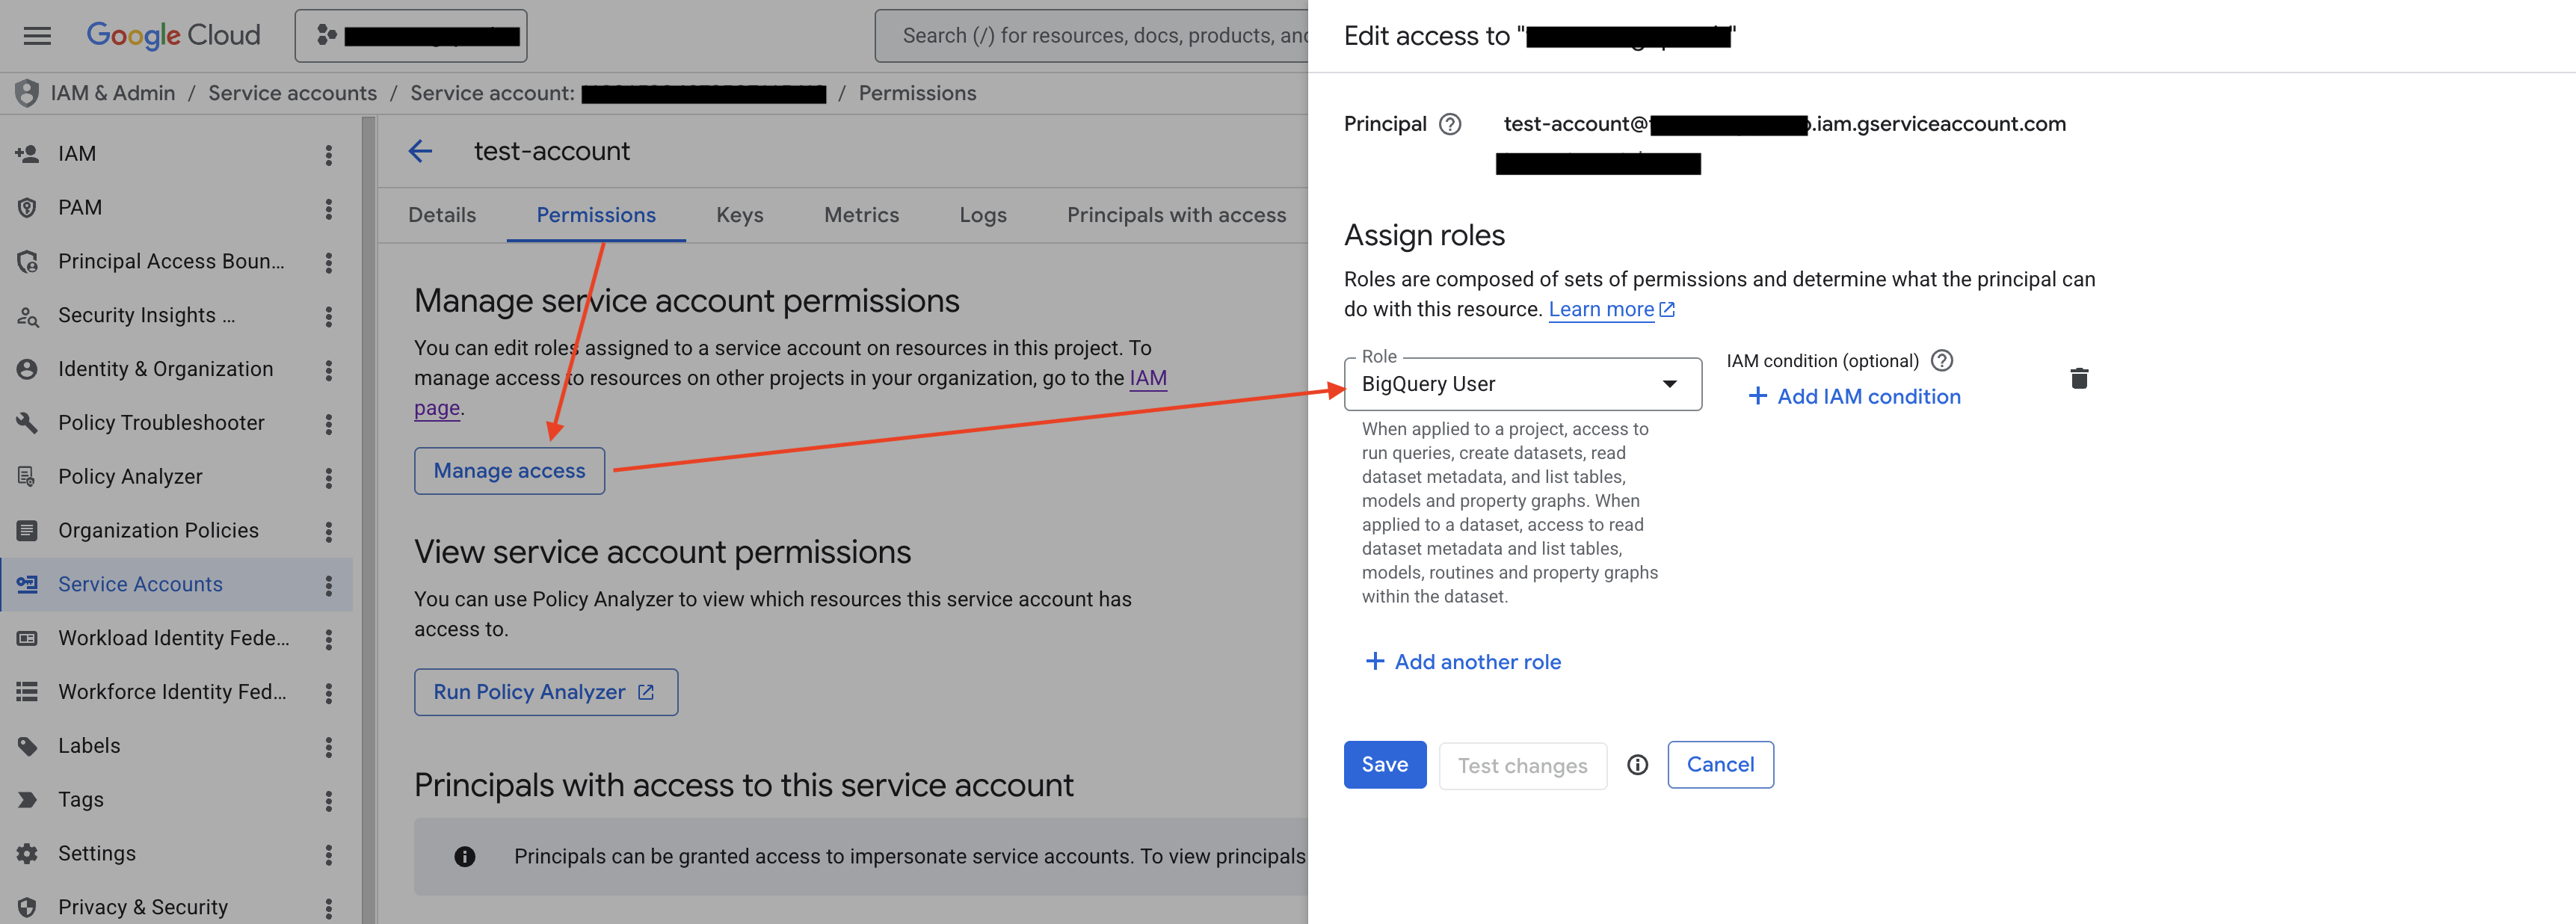
Step 3.1: Grant the BigQuery User role to the service account
Go back to the GCP service account details page (the same page you opened in Step 2.1), switch to the Permissions tab, and under Manage service account permissions, click Manage access. In the Edit access panel on the right, make sure Principal is set to the current service account itself, select the BigQuery User role under Assign roles, and click Save.
This role is used to create and run query jobs in the BigQuery project, and is the foundation for all subsequent data operations.
Step 3.2: Grant the BigQuery Data Viewer role on the source datasets
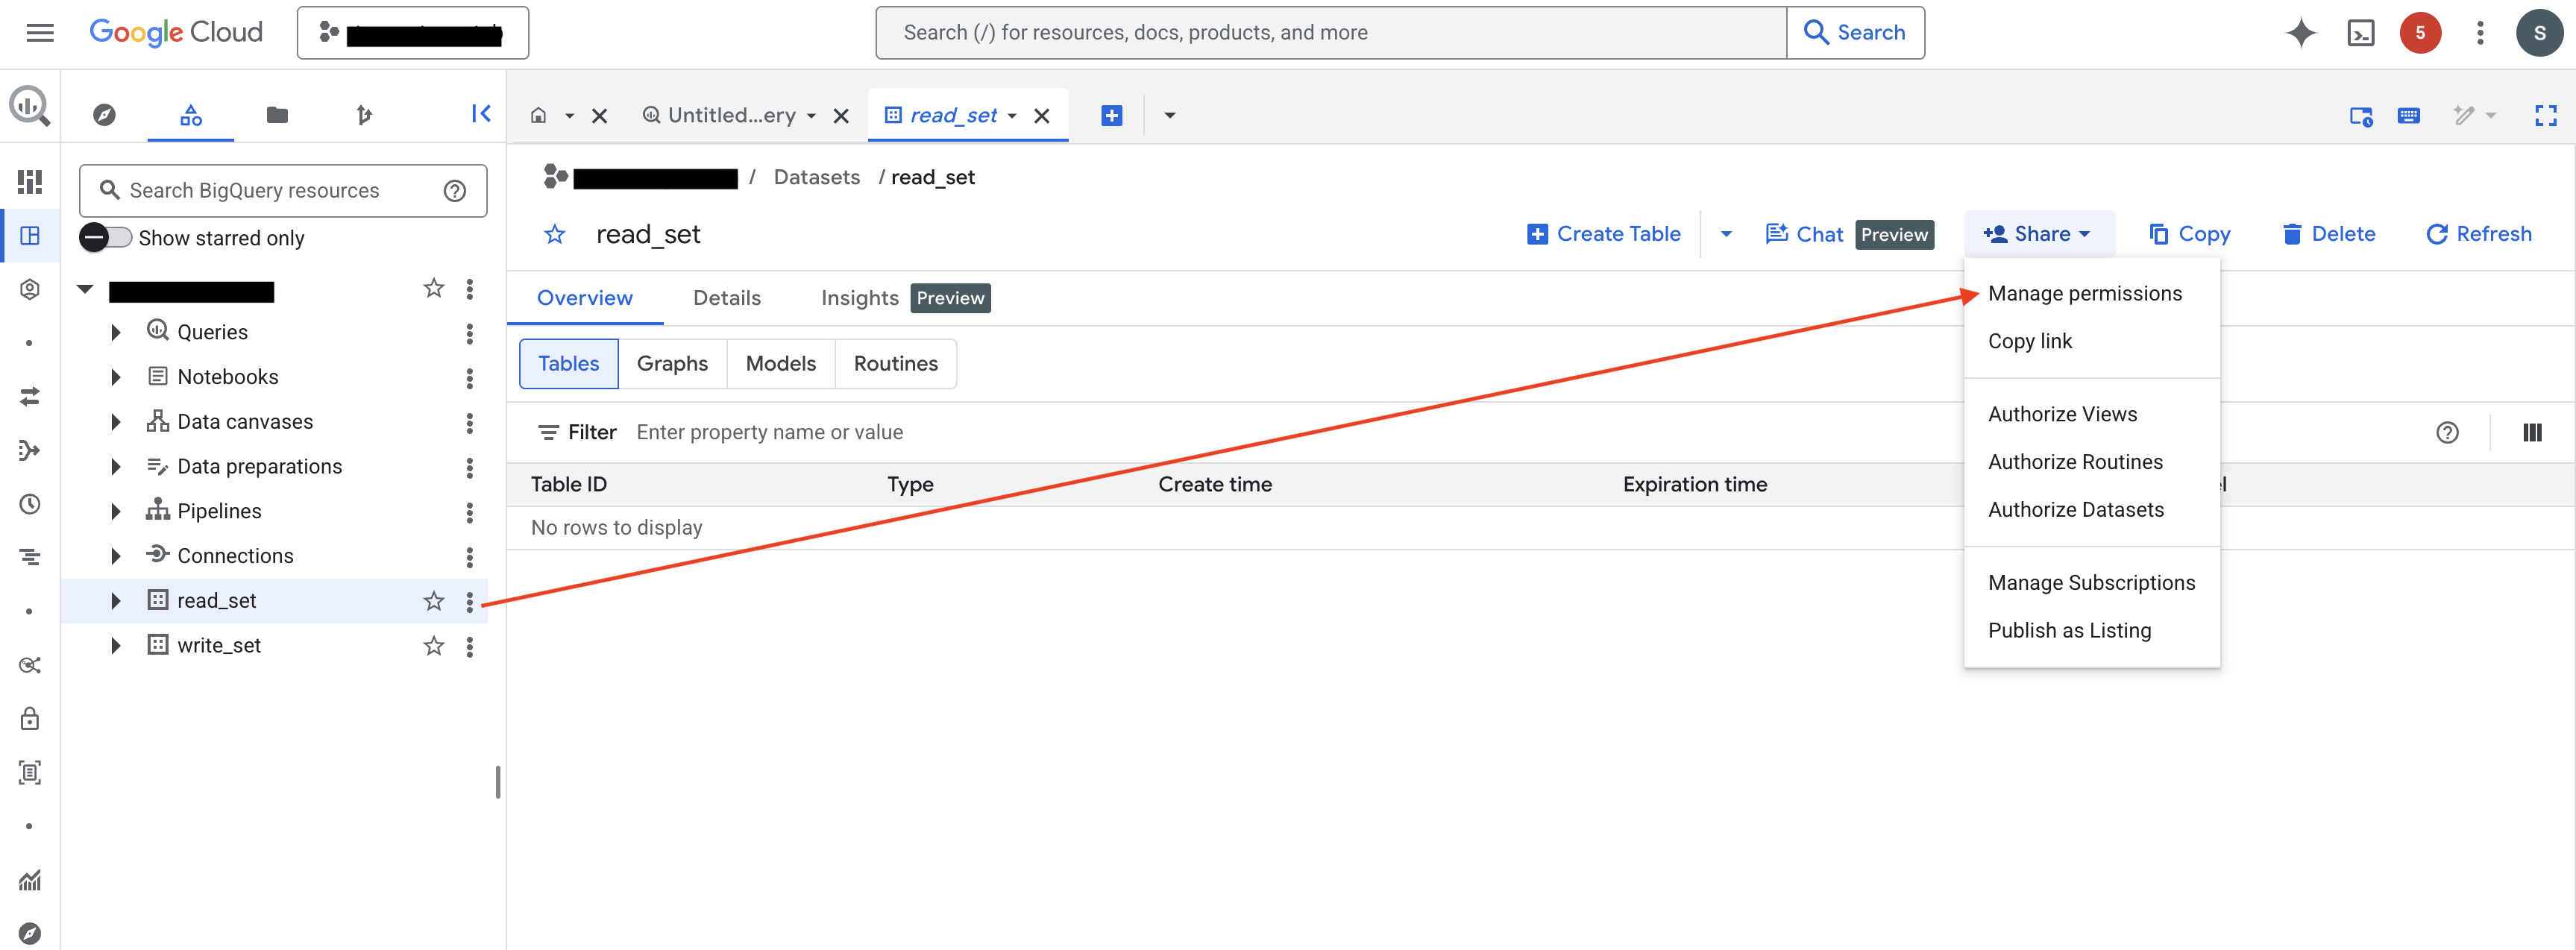
Navigate to BigQuery Studio, select the dataset you want ABetterChoice to access, then click Sharing → Permissions → Add Principal, add your service account as a principal, and grant it the BigQuery Data Viewer role.
Repeat this for every dataset you want to use as a metric data source.

Step 3.3: Grant the BigQuery Data Editor role on the staging dataset
ABetterChoice needs a dataset to store temporary tables (assignment tables) and materialized results during query execution. In BigQuery Studio, pick or create a dataset dedicated to this purpose, add your service account as a principal in the same way, and grant it the BigQuery Data Editor role.
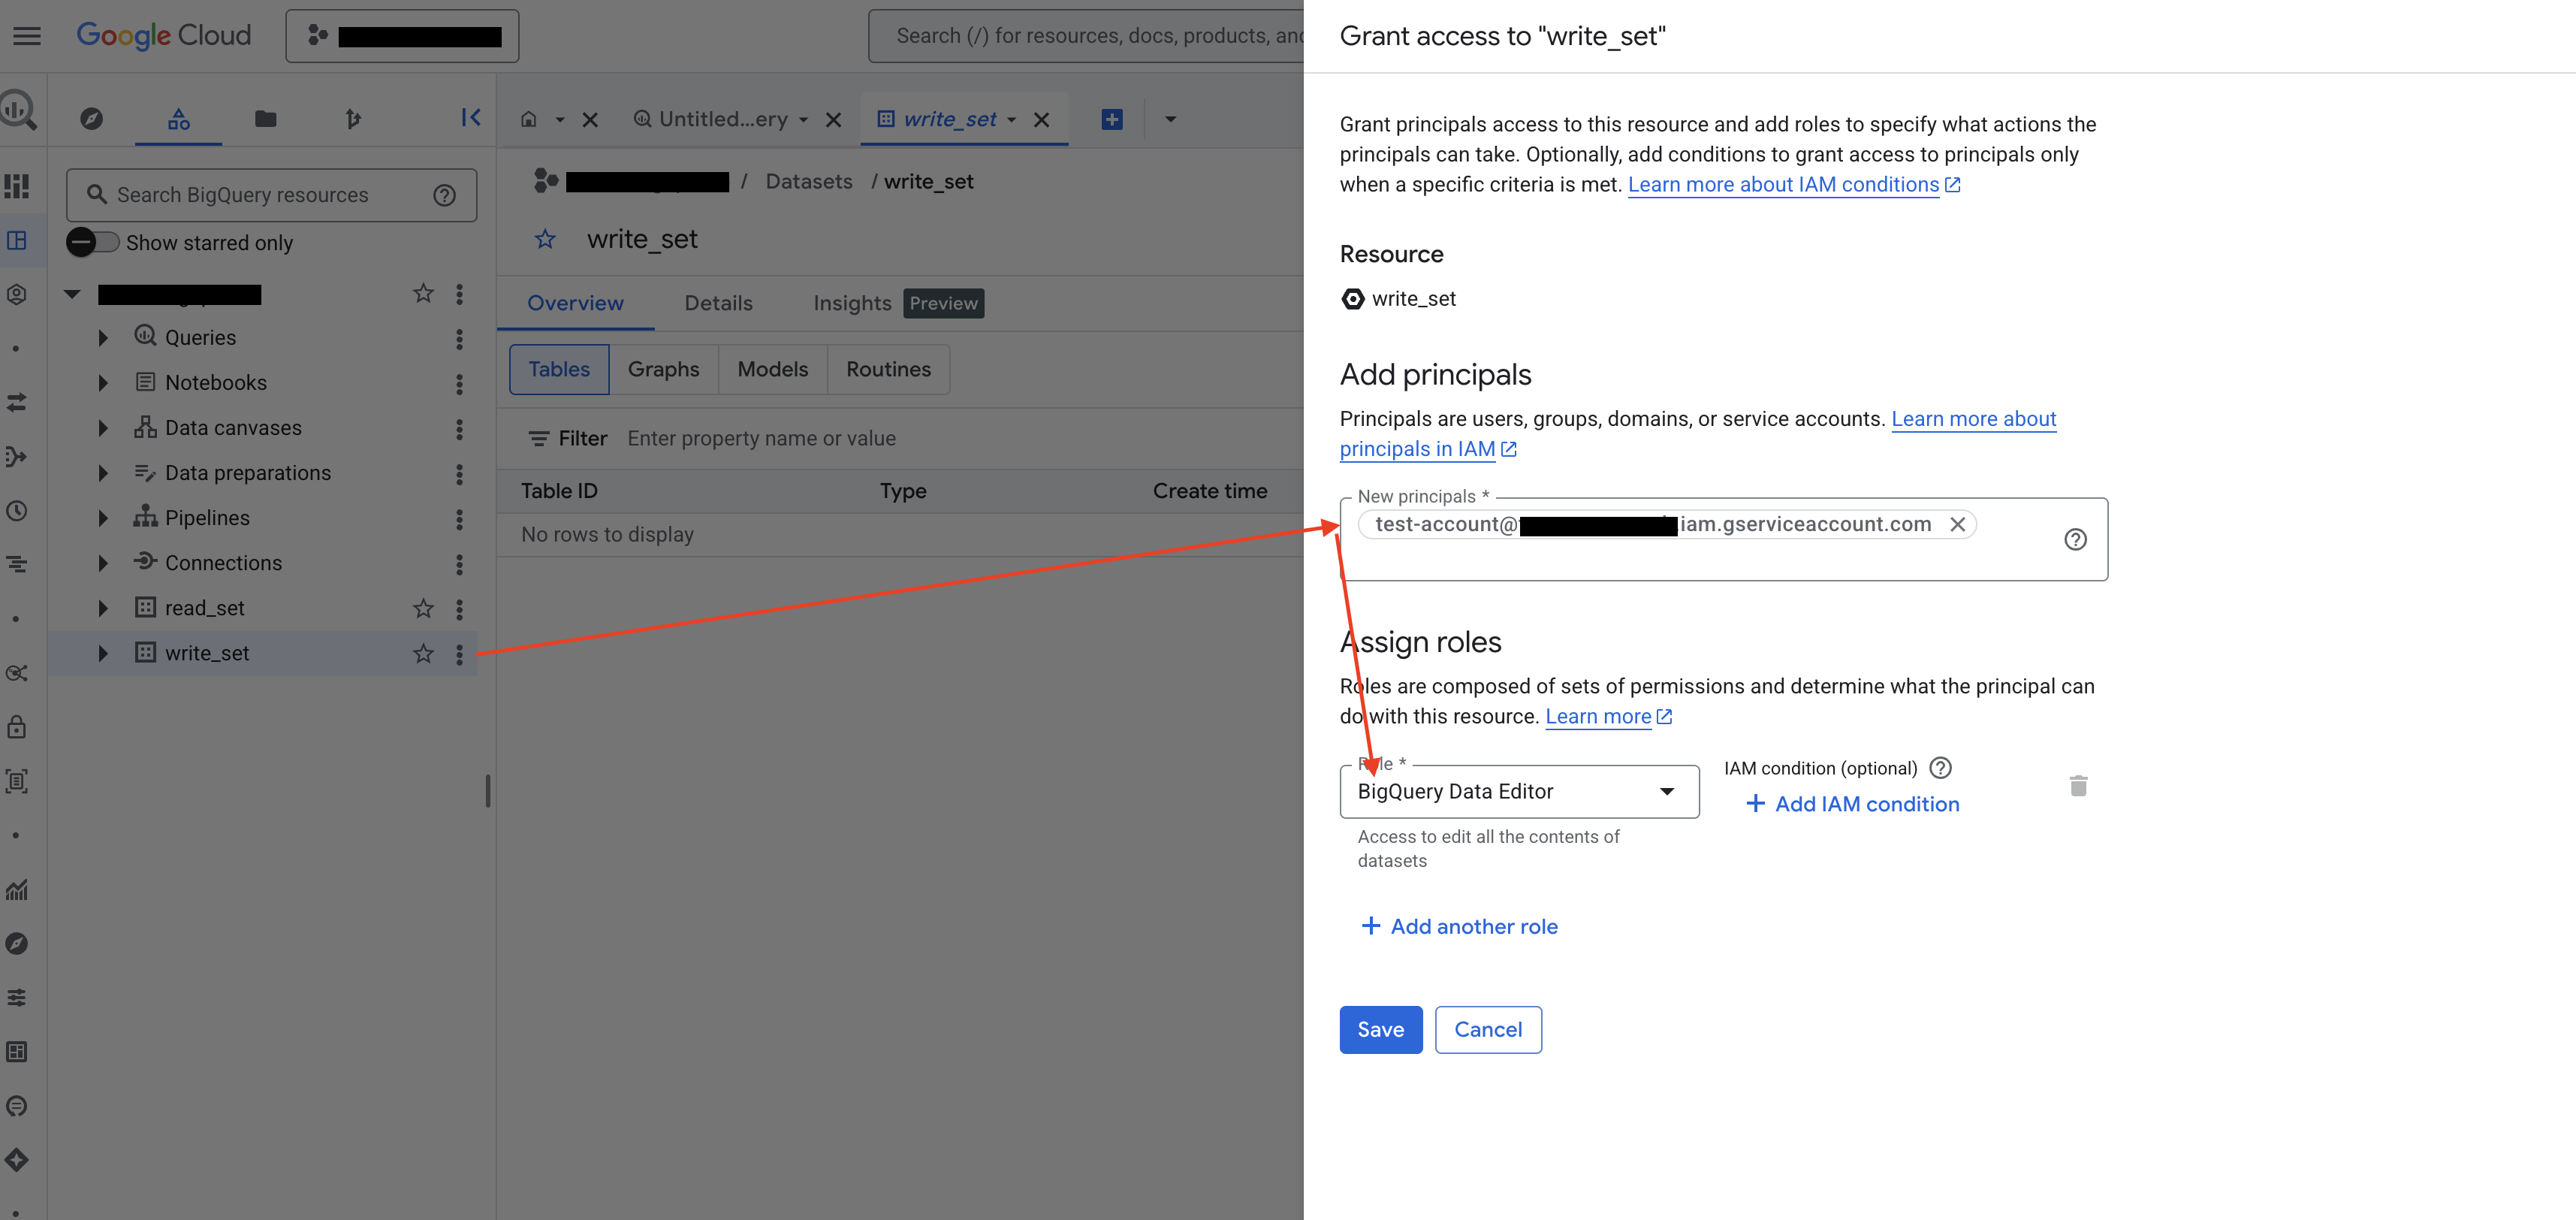
Take note of this dataset's ID — you will need it when filling in the BigQuery DataSet field in Step 4.
After completing the three sub-steps above, your service account will have all the permissions required to run queries, read source data, and materialize results.
Step 4 · Grant Dataproc permissions to the service account (optional · HTE analysis)
This step is only required if you plan to use HTE (Heterogeneous Treatment Effect) analysis in ABetterChoice. HTE analysis relies on Google Cloud Dataproc to run distributed compute jobs, so your service account needs the corresponding Dataproc permissions. If you are not using HTE analysis for now, you can skip directly to Step 5.
Step 4.1: Enable the Dataproc API in the project
Open the Cloud Dataproc API page in the GCP console and make sure its status is Enabled. If it is not yet enabled, click the Enable button to turn it on.
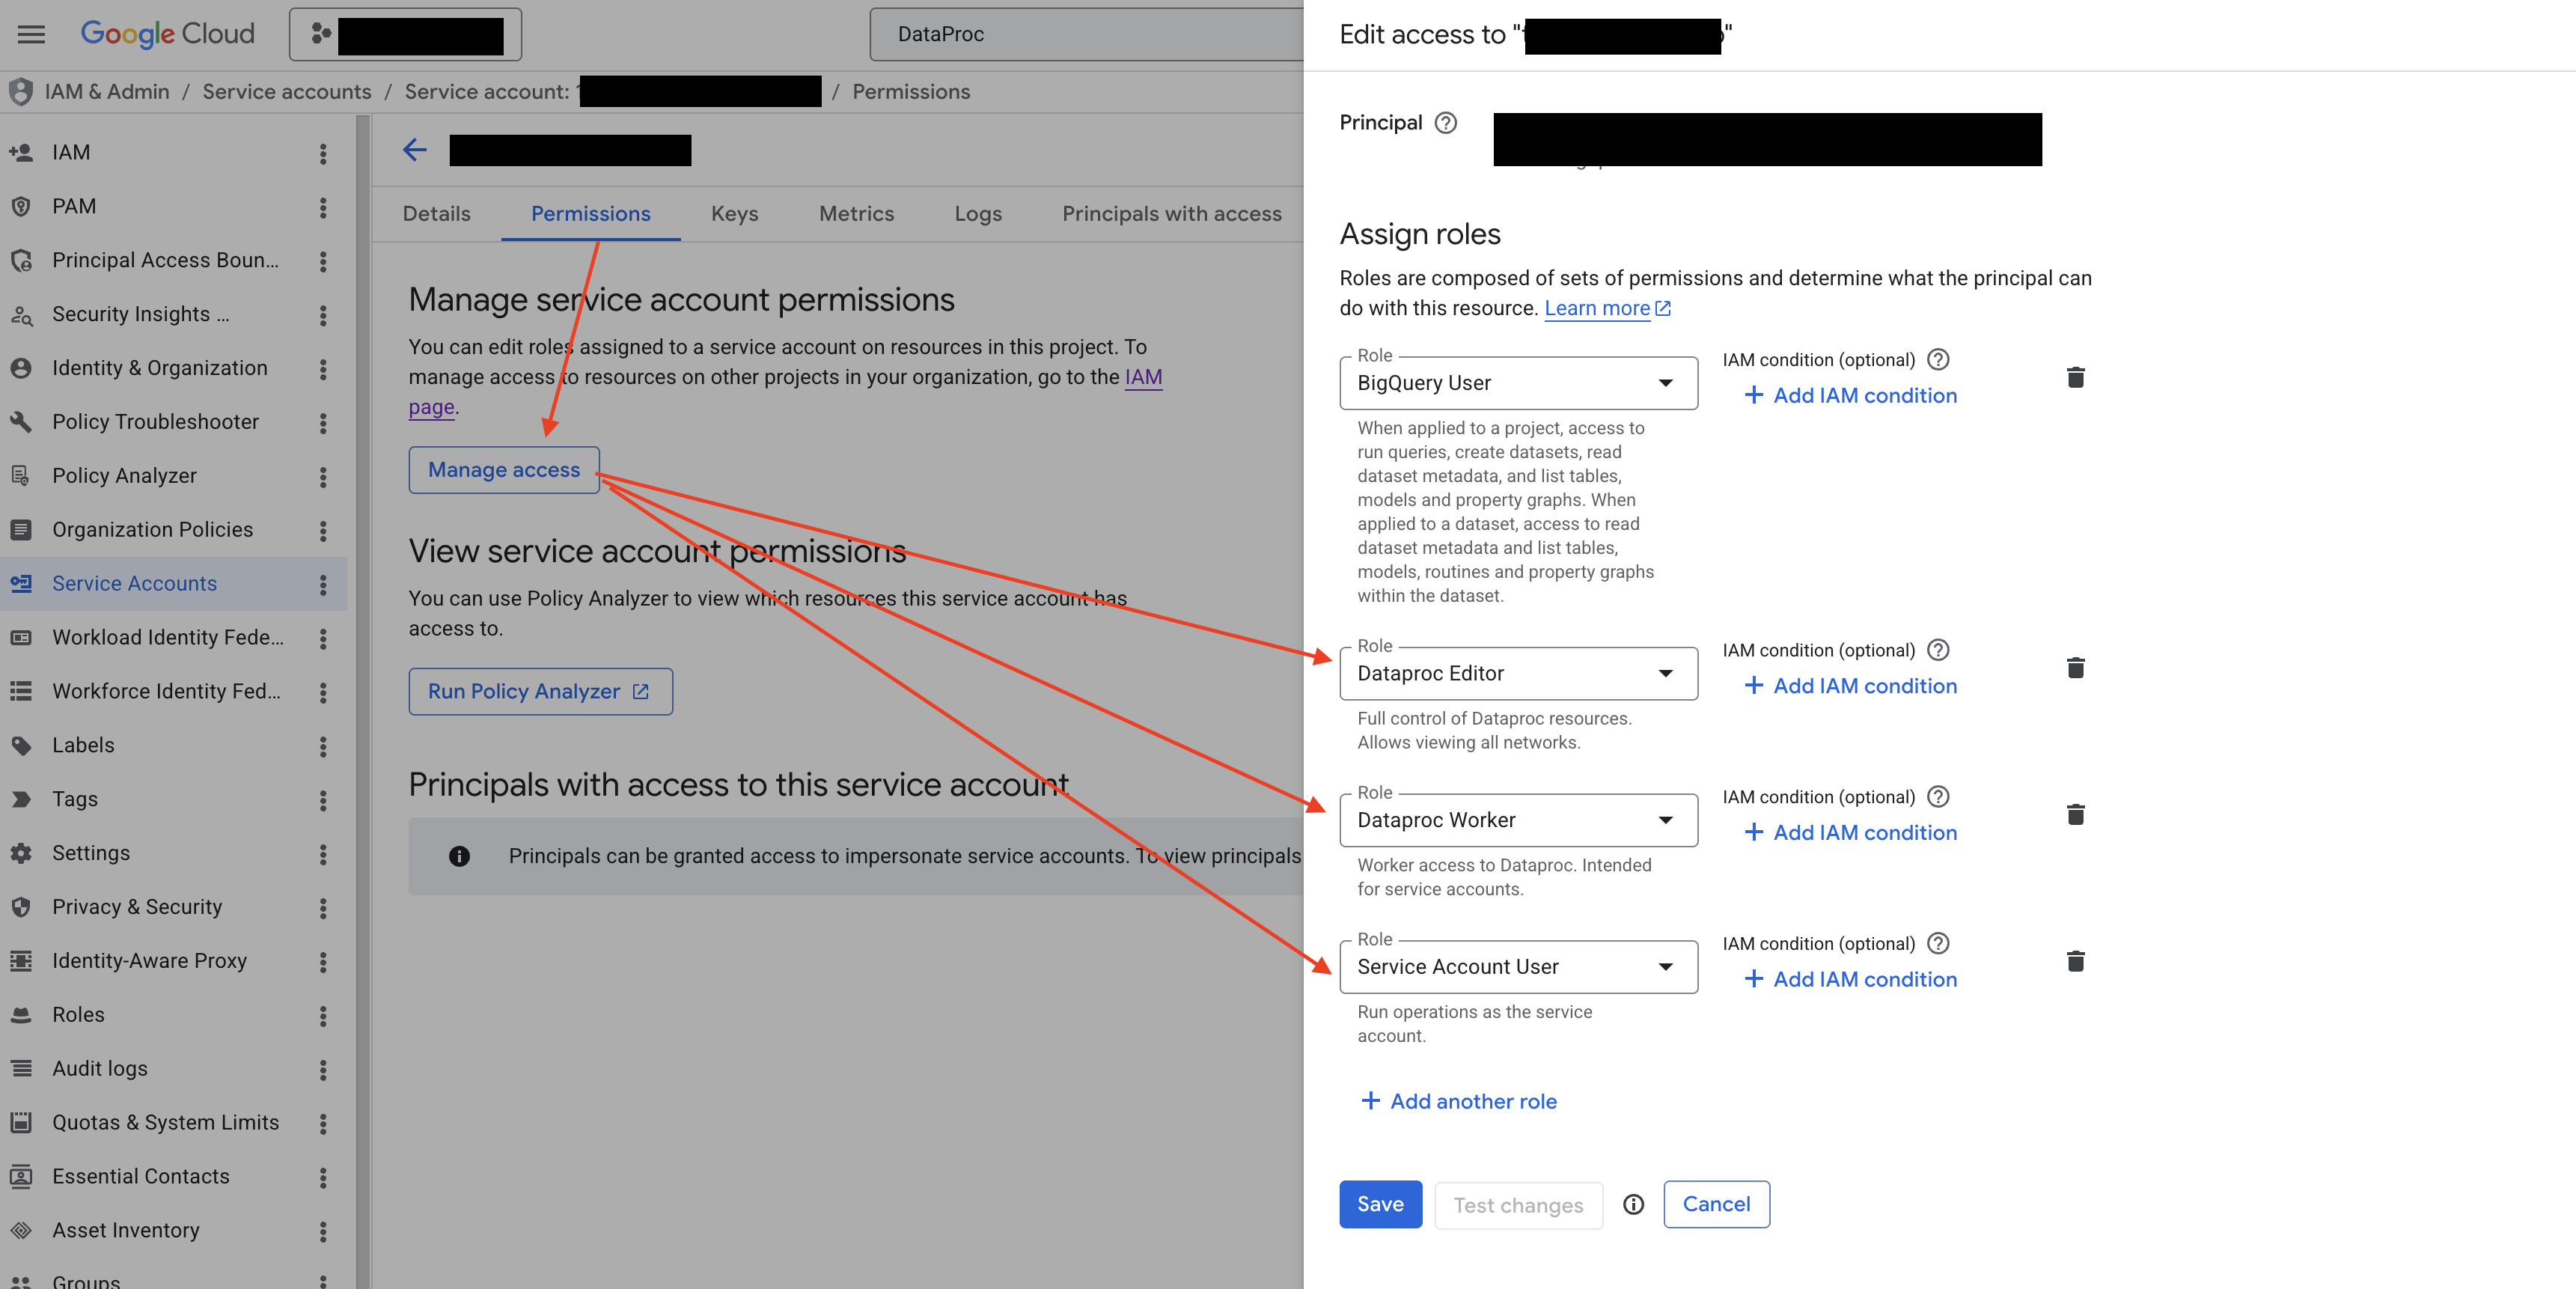
Step 4.2: Grant the Dataproc Editor, Dataproc Worker, and Service Account User roles to the service account
Go back to the GCP service account details page (the same page you opened in Step 2.1), switch to the Permissions tab, and under Manage service account permissions, click Manage access. In the Edit access panel on the right, make sure Principal is set to the current service account itself, add the following three roles, and click Save:
- Dataproc Editor (
roles/dataproc.editor): used to create and manage Dataproc clusters and submit compute jobs. - Dataproc Worker (
roles/dataproc.worker): the role required by the "execution identity" of Dataproc Serverless (Batch) workloads. It provides the minimum permissions the Spark driver / executors need to access Compute, Cloud Storage, Logging, and related resources. Without it, Batch workloads fail right at startup. - Service Account User (
roles/iam.serviceAccountUser): allows Dataproc Batch to launch worker VMs running as this service account (i.e. theiam.serviceAccounts.actAspermission).
These three roles govern completely different things, and all are required:
Dataproc Editordecides "whether the caller is allowed to submit jobs via the Dataproc API",Dataproc Workerdecides "whether the worker, once started, has the resource permissions needed to execute Spark workloads", andService Account Userdecides "whether the service account can be attached to a Dataproc worker VM". MissingService Account Usermeans jobs can enter the queue but workers fail to start, with errors likePERMISSION_DENIED: ... iam.serviceAccounts.actAs; missingDataproc Workermeans workers start up but the workload fails because it cannot read/write intermediate data or emit logs.
Step 4.3: Prepare the VPC subnet used by Dataproc
When ABetterChoice submits a Dataproc Batch (Serverless) job without explicitly specifying a VPC, Dataproc defaults to the subnet of the VPC named default in your project that lives in the same region as the job. Make sure the following conditions are met:
- A
defaultVPC network exists in the project. Open the VPC networks page to check. If it does not exist (e.g. it was deleted earlier, or an organization policy disables auto-creation), click Create VPC network, name itdefault, choose Automatic as the subnet creation mode, and create the network. - Private Google Access is enabled on the subnet of the job's region. Open the corresponding subnet details page and set Private Google access to On. This is required for Dataproc Serverless to reach Google APIs and pull images.
- Firewall rules allow internal communication within the subnet. Make sure rules such as
default-allow-internalexist (the auto-createddefaultVPC ships with this rule; if you use a custom network, manually open up TCP/UDP/ICMP on all ports within the subnet).
Take note of the full subnet URI (in the form
projects/<PROJECT>/regions/<REGION>/subnetworks/<SUBNET>) — you will need it when filling in the Subnetwork URI field in Step 5. If your organization policy does not allow creating a VPC nameddefault, please contact the ABetterChoice support team — we can explicitly specify a custom VPC/subnet in the job configuration.
After completing these sub-steps, ABetterChoice will be able to run the compute jobs required for HTE analysis on Dataproc on behalf of your service account.
Step 5 · Fill in the connection details on the ABetterChoice platform
Go back to the ABetterChoice data source configuration page you opened in Step 1 and fill in the fields one by one as described below.
5.1 Field reference
| Field | Required | Description |
|---|---|---|
| Business Account | Required | Your GCP service account email, in the form xxx@<project>.iam.gserviceaccount.com — the same service account you authorized in Step 2. |
| BigQuery Project ID | Required | The ID of the GCP project that hosts your BigQuery data. See 5.2 How to find the BigQuery Project ID. |
| Data Location | Required | The region where your BigQuery datasets live (e.g. US, asia-east1). See 5.3 How to find the Data Location. |
| Timezone | Required | The timezone used for parsing time fields and rendering reports, e.g. Asia/Shanghai, UTC. We recommend keeping it consistent with the timezone of your business data. |
| BigQuery DataSet | Required | The ID of the dataset used for storing temporary tables and materialized results — i.e. the dataset you granted BigQuery Data Editor to in Step 3.3. |
| Subnetwork URI | Optional | Required only for HTE analysis. The full URI of the VPC subnet used by Dataproc jobs — i.e. the subnet you prepared in Step 4.3. Format: projects/<PROJECT>/regions/<REGION>/subnetworks/<SUBNET>. |
5.2 How to find the BigQuery Project ID
In the Google Cloud console, click the project dropdown at the top. In the project list that appears, the ID column of each row is the project ID (note that the ID and the project name are usually different).

5.3 How to find the Data Location
Open BigQuery Studio, expand your dataset in the Explorer panel on the left, and click on the dataset name. The Data location field in the details panel on the right is your data location.

5.4 Save and test the connection
After filling in all the fields, click Save. ABetterChoice will automatically run a connection test:
- Connection succeeded: the status in the data source list becomes "Connected" — your BigQuery connection is set up, and you can start creating metrics and experiments.
- Connection failed: follow the error message in the dialog, go back to the corresponding step, and check the authorization, permissions, or the values you entered. Common causes include: the service account was not granted the Token Creator role, dataset permissions were not granted, or the Project ID / Data Location was entered incorrectly.